


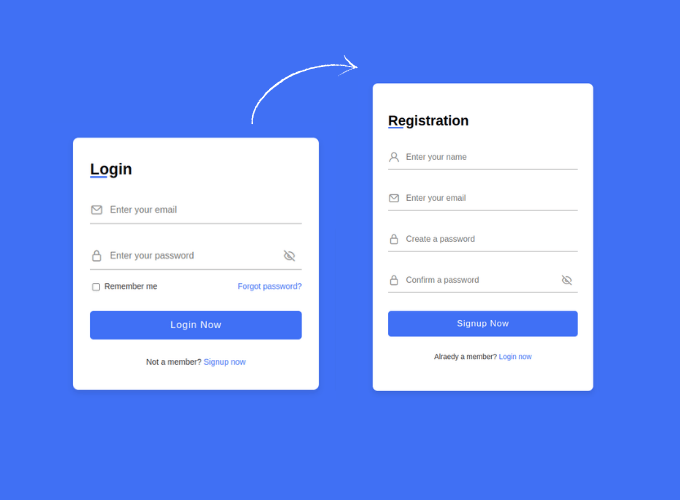
In this article, we are going to make responsive login & registration form in HTML, CSS & JavaScript, so in this form we will have two sections one for login and second for signup, we will also add some animation while switching between these two. Basically, this is going to be a fun project to do.
You can see the demo here Responsive Login and Registration Form in HTML, CSS
Pre-requisites To Make Responsive Login and Registration Form in HTML, CSS & JavaScript
- Good knowledge of HTML.
- Good knowledge of CSS & CSS3.
- Good knowledge of JavaScript.
Building Login Form Skeleton
<head>
	<link rel="stylesheet" href="<https://unicons.iconscout.com/release/v4.0.0/css/line.css>">
  <link rel="stylesheet" href="style.css">
</head>
<body>
<div class="container">
        <div class="forms">
            <div class="form login">
                <span class="title">Login</span>

                <form action="#">
                    <div class="input-field">
                        <input type="text" placeholder="Enter your email" required>
                        <i class="uil uil-envelope icon"></i>
                    </div>
                    <div class="input-field">
                        <input type="password" class="password" placeholder="Enter your password" required>
                        <i class="uil uil-lock icon"></i>
                        <i class="uil uil-eye-slash showHidePw"></i>
                    </div>

                    <div class="checkbox-text">
                        <div class="checkbox-content">
                            <input type="checkbox" id="logCheck">
                            <label for="logCheck" class="text">Remember me</label>
                        </div>

                        <a href="#" class="text">Forgot password?</a>
                    </div>

                    <div class="input-field button">
                        <input type="button" value="Login Now">
                    </div>
                </form>

                <div class="login-signup">
                    <span class="text">Not a member?
                        <a href="#" class="text signup-link">Signup now</a>
                    </span>
                </div>
            </div>
</body>
First of all, we have linked two CSS files, first is icon scout which is available in google we have just put its link in here with this CSS we can actually get icons like email, password and many more. after that we have style.css in which we will add styles.
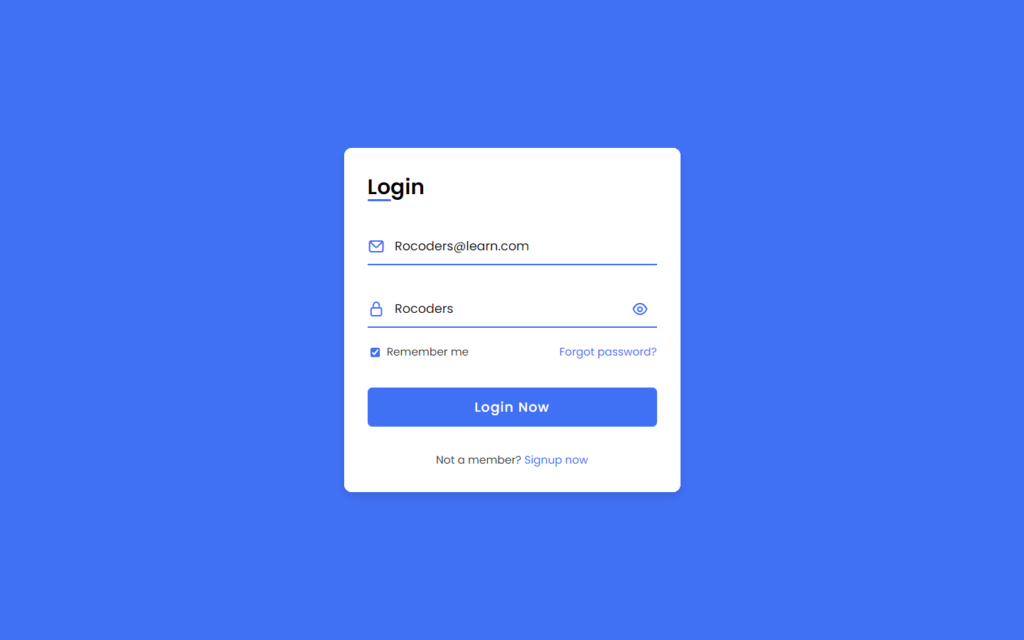
Now we need to create our login form first, so for that we need a heading called login then input field for email, and password then we need here checkbox for remember me and lastly a login button then signup link and forgot password. here we added icons for email and password.
@import url('<https://fonts.googleapis.com/css2?family=Poppins:wght@300;400;500;600;700&display=swap>');

*{
    margin: 0;
    padding: 0;
    box-sizing: border-box;
    font-family: 'Poppins', sans-serif;
}

body{
    height: 100vh;
    display: flex;
    align-items: center;
    justify-content: center;
    background-color: #4070f4;
}

.container{
    position: relative;
    max-width: 430px;
    width: 100%;
    background: #fff;
    border-radius: 10px;
    box-shadow: 0 5px 10px rgba(0, 0, 0, 0.1);
    overflow: hidden;
    margin: 0 20px;
}
Now let’s add a google font named Poppins, you can find out on google fonts. this font we are going to use in whole project, after that lets remove all default margin and padding for that let’s select all elements with asterisk(*) and add font-family Poppins.
For body, we need our form in the center, so for that lets add display flex, justify content to center, and align-items to center, and for the background we need blue color. after that, for container we used relative and max-width of 430px also we provided box-shadow of 5px and 10px, overflow to hidden, so elements out of the container won’t be visible.

Customizing The Form
.container .form{
    width: 50%;
    padding: 30px;
    background-color: #fff;
}

.container .form .title{
    position: relative;
    font-size: 27px;
    font-weight: 600;
}

.form .title::before{
    content: '';
    position: absolute;
    left: 0;
    bottom: 0;
    height: 3px;
    width: 30px;
    background-color: #4070f4;
    border-radius: 25px;
}
Now let’s customize the title first, for that we need to increase font size and weight to 27px and 600 respectively, after that we need the line under the login of color blue of 30px width and 3px height and position will absolute.
.form .input-field{
    position: relative;
    height: 50px;
    width: 100%;
    margin-top: 30px;
}

.input-field input{
    position: absolute;
    height: 100%;
    width: 100%;
    padding: 0 35px;
    border: none;
    outline: none;
    font-size: 16px;
    border-bottom: 2px solid #ccc;
    border-top: 2px solid transparent;
    transition: all 0.2s ease;
}

.input-field input:is(:focus, :valid){
    border-bottom-color: #4070f4;
}

.container .forms{
    display: flex;
    align-items: center;
    height: 440px;
    width: 200%;
    transition: height 0.2s ease;
}
Now for the input fields, we will remove border and outline with this input fields looks good, after that lets add border from border of 2px solid also we need border from top as well, but we will make it transparent also we will add a transition for 0.2 seconds of ease type, after that lets add effect on if field gets focus or given input valid for that we will add bottom border color to blue.
.input-field i{
    position: absolute;
    top: 50%;
    transform: translateY(-50%);
    color: #999;
    font-size: 23px;
    transition: all 0.2s ease;
}

.input-field input:is(:focus, :valid) ~ i{
    color: #4070f4;
}

.input-field i.icon{
    left: 0;
}
.input-field i.showHidePw{
    right: 0;
    cursor: pointer;
    padding: 10px;
}
After that, let’s set icon customization, so let’s put or icon to middle of the input field’s height for that we will use translateY, now let’s give color of #999 also transition for 0.2 seconds of ease type, then we will change color of icons if input field gets focused or valid input given. after that, let’s put icons on the left side of the field, now we have used one more icon to show password we need it to right side of the password field also we need cursor changes to pointer if the show password icon gets hover.
.form .checkbox-text{
    display: flex;
    align-items: center;
    justify-content: space-between;
    margin-top: 20px;
}

.checkbox-text .checkbox-content{
    display: flex;
    align-items: center;
}

.checkbox-content input{
    margin: 0 8px -2px 4px;
    accent-color: #4070f4;
}

.form .text{
    color: #333;
    font-size: 14px;
}

.form a.text{
    color: #4070f4;
    text-decoration: none;
}
.form a:hover{
    text-decoration: underline;
}

.form .button{
    margin-top: 35px;
}
Now let’s customize checkbox for that we just need to put margin between checkbox and the text, also we will add color if checkbox is clicked to blue color. after that, we will add forgot password and signup now links for that we just add underline decoration means that if we hover the links then the underline will be shown.
.form .button input{
    border: none;
    color: #fff;
    font-size: 17px;
    font-weight: 500;
    letter-spacing: 1px;
    border-radius: 6px;
    background-color: #4070f4;
    cursor: pointer;
    transition: all 0.3s ease;
}

.button input:hover{
    background-color: #265df2;
}

.form .login-signup{
    margin-top: 30px;
    text-align: center;
}
Now for the login button, we don’t need it’s border also we will provide letter-spacing of 1px, so letter inside the button will be spread, then we need border radius of 6px with this button’s edges will be formed into round shape, again we’ll change cursor to pointer, when we hover the button should change color to #265df2.

Adding Signup Form
<div class="form signup">
                <span class="title">Registration</span>

                <form action="#">
                    <div class="input-field">
                        <input type="text" placeholder="Enter your name" required>
                        <i class="uil uil-user"></i>
                    </div>
                    <div class="input-field">
                        <input type="text" placeholder="Enter your email" required>
                        <i class="uil uil-envelope icon"></i>
                    </div>
                    <div class="input-field">
                        <input type="password" class="password" placeholder="Create a password" required>
                        <i class="uil uil-lock icon"></i>
                    </div>
                    <div class="input-field">
                        <input type="password" class="password" placeholder="Confirm a password" required>
                        <i class="uil uil-lock icon"></i>
                        <i class="uil uil-eye-slash showHidePw"></i>
                    </div>

                    <div class="input-field button">
                        <input type="button" value="Signup Now">
                    </div>
                </form>

                <div class="login-signup">
                    <span class="text">Alraedy a member?
                        <a href="#" class="text login-link">Login now</a>
                    </span>
                </div>
            </div>
Same as login form, we can just copy and paste the login for and change heading to signup also we will add some fields like name and confirm password now we will also remove some links forgot password and remember me checkbox.
Adding Animation To Forms
We can add some animation while switching from one form to another, it will give some cool effect to the forms:
.container.active .login{
    margin-left: -50%;
    opacity: 0;
    transition: margin-left 0.18s ease, opacity 0.15s ease;
}

.container .signup{
    opacity: 0;
    transition: opacity 0.09s ease;
}
.container.active .signup{
    opacity: 1;
    transition: opacity 0.2s ease;
}

.container.active .forms{
    height: 600px;
}
Adding Functionality To Forms
const container = document.querySelector(".container"),
      pwShowHide = document.querySelectorAll(".showHidePw"),
      pwFields = document.querySelectorAll(".password"),
      signUp = document.querySelector(".signup-link"),
      login = document.querySelector(".login-link");


    pwShowHide.forEach(eyeIcon =>{
        eyeIcon.addEventListener("click", ()=>{
            pwFields.forEach(pwField =>{
                if(pwField.type ==="password"){
                    pwField.type = "text";

                    pwShowHide.forEach(icon =>{
                        icon.classList.replace("uil-eye-slash", "uil-eye");
                    })
                }else{
                    pwField.type = "password";

                    pwShowHide.forEach(icon =>{
                        icon.classList.replace("uil-eye", "uil-eye-slash");
                    })
                }
            })
        })
    })


    signUp.addEventListener("click", ( )=>{
        container.classList.add("active");
    });
    login.addEventListener("click", ( )=>{
        container.classList.remove("active");
    });
Now let’s add functionality to our forms while switching and to show/hide password, so for that we will get the password from field and let’s loop the text till it gets end, in this we will add an event listener of click event, we will check here if valid input given or not if yes then we will change password into simple text, and also we will change the eye slash icon to eye.
After that, if we click on signup link we will add the click event in which we will activate the signup form, so login form will be removed, and signup form will be shown, also if we click on login link then we remove active which corresponds to signup form.
Full Source Code Of Responsive Login and Registration Form in HTML CSS & JavaScript
index.html
<!DOCTYPE html>
<html lang="en">
<head>
    <meta charset="UTF-8">
    <meta http-equiv="X-UA-Compatible" content="IE=edge">
    <meta name="viewport" content="width=device-width, initial-scale=1.0">
    <link rel="stylesheet" href="<https://unicons.iconscout.com/release/v4.0.0/css/line.css>">
    <link rel="stylesheet" href="style.css">

    <title>Login & Registration Form</title>
</head>
<body>

    <div class="container">
        <div class="forms">
            <div class="form login">
                <span class="title">Login</span>

                <form action="#">
                    <div class="input-field">
                        <input type="text" placeholder="Enter your email" required>
                        <i class="uil uil-envelope icon"></i>
                    </div>
                    <div class="input-field">
                        <input type="password" class="password" placeholder="Enter your password" required>
                        <i class="uil uil-lock icon"></i>
                        <i class="uil uil-eye-slash showHidePw"></i>
                    </div>

                    <div class="checkbox-text">
                        <div class="checkbox-content">
                            <input type="checkbox" id="logCheck">
                            <label for="logCheck" class="text">Remember me</label>
                        </div>

                        <a href="#" class="text">Forgot password?</a>
                    </div>

                    <div class="input-field button">
                        <input type="button" value="Login Now">
                    </div>
                </form>

                <div class="login-signup">
                    <span class="text">Not a member?
                        <a href="#" class="text signup-link">Signup now</a>
                    </span>
                </div>
            </div>


            <div class="form signup">
                <span class="title">Registration</span>

                <form action="#">
                    <div class="input-field">
                        <input type="text" placeholder="Enter your name" required>
                        <i class="uil uil-user"></i>
                    </div>
                    <div class="input-field">
                        <input type="text" placeholder="Enter your email" required>
                        <i class="uil uil-envelope icon"></i>
                    </div>
                    <div class="input-field">
                        <input type="password" class="password" placeholder="Create a password" required>
                        <i class="uil uil-lock icon"></i>
                    </div>
                    <div class="input-field">
                        <input type="password" class="password" placeholder="Confirm a password" required>
                        <i class="uil uil-lock icon"></i>
                        <i class="uil uil-eye-slash showHidePw"></i>
                    </div>

                    <div class="input-field button">
                        <input type="button" value="Signup Now">
                    </div>
                </form>

                <div class="login-signup">
                    <span class="text">Alraedy a member?
                        <a href="#" class="text login-link">Login now</a>
                    </span>
                </div>
            </div>
        </div>
    </div>

    <script src="script.js"></script>

</body>
</html>
style.css
@import url('<https://fonts.googleapis.com/css2?family=Poppins:wght@300;400;500;600;700&display=swap>');

*{
    margin: 0;
    padding: 0;
    box-sizing: border-box;
    font-family: 'Poppins', sans-serif;
}

body{
    height: 100vh;
    display: flex;
    align-items: center;
    justify-content: center;
    background-color: #4070f4;
}

.container{
    position: relative;
    max-width: 430px;
    width: 100%;
    background: #fff;
    border-radius: 10px;
    box-shadow: 0 5px 10px rgba(0, 0, 0, 0.1);
    overflow: hidden;
    margin: 0 20px;
}

.container .forms{
    display: flex;
    align-items: center;
    height: 440px;
    width: 200%;
    transition: height 0.2s ease;
}

.container .form{
    width: 50%;
    padding: 30px;
    background-color: #fff;
    transition: margin-left 0.18s ease;
}

.container.active .login{
    margin-left: -50%;
    opacity: 0;
    transition: margin-left 0.18s ease, opacity 0.15s ease;
}

.container .signup{
    opacity: 0;
    transition: opacity 0.09s ease;
}
.container.active .signup{
    opacity: 1;
    transition: opacity 0.2s ease;
}

.container.active .forms{
    height: 600px;
}
.container .form .title{
    position: relative;
    font-size: 27px;
    font-weight: 600;
}

.form .title::before{
    content: '';
    position: absolute;
    left: 0;
    bottom: 0;
    height: 3px;
    width: 30px;
    background-color: #4070f4;
    border-radius: 25px;
}

.form .input-field{
    position: relative;
    height: 50px;
    width: 100%;
    margin-top: 30px;
}

.input-field input{
    position: absolute;
    height: 100%;
    width: 100%;
    padding: 0 35px;
    border: none;
    outline: none;
    font-size: 16px;
    border-bottom: 2px solid #ccc;
    border-top: 2px solid transparent;
    transition: all 0.2s ease;
}

.input-field input:is(:focus, :valid){
    border-bottom-color: #4070f4;
}

.input-field i{
    position: absolute;
    top: 50%;
    transform: translateY(-50%);
    color: #999;
    font-size: 23px;
    transition: all 0.2s ease;
}

.input-field input:is(:focus, :valid) ~ i{
    color: #4070f4;
}

.input-field i.icon{
    left: 0;
}
.input-field i.showHidePw{
    right: 0;
    cursor: pointer;
    padding: 10px;
}

.form .checkbox-text{
    display: flex;
    align-items: center;
    justify-content: space-between;
    margin-top: 20px;
}

.checkbox-text .checkbox-content{
    display: flex;
    align-items: center;
}

.checkbox-content input{
    margin: 0 8px -2px 4px;
    accent-color: #4070f4;
}

.form .text{
    color: #333;
    font-size: 14px;
}

.form a.text{
    color: #4070f4;
    text-decoration: none;
}
.form a:hover{
    text-decoration: underline;
}

.form .button{
    margin-top: 35px;
}

.form .button input{
    border: none;
    color: #fff;
    font-size: 17px;
    font-weight: 500;
    letter-spacing: 1px;
    border-radius: 6px;
    background-color: #4070f4;
    cursor: pointer;
    transition: all 0.3s ease;
}

.button input:hover{
    background-color: #265df2;
}

.form .login-signup{
    margin-top: 30px;
    text-align: center;
}
script.js
const container = document.querySelector(".container"),
      pwShowHide = document.querySelectorAll(".showHidePw"),
      pwFields = document.querySelectorAll(".password"),
      signUp = document.querySelector(".signup-link"),
      login = document.querySelector(".login-link");

    //   js code to show/hide password and change icon
    pwShowHide.forEach(eyeIcon =>{
        eyeIcon.addEventListener("click", ()=>{
            pwFields.forEach(pwField =>{
                if(pwField.type ==="password"){
                    pwField.type = "text";

                    pwShowHide.forEach(icon =>{
                        icon.classList.replace("uil-eye-slash", "uil-eye");
                    })
                }else{
                    pwField.type = "password";

                    pwShowHide.forEach(icon =>{
                        icon.classList.replace("uil-eye", "uil-eye-slash");
                    })
                }
            })
        })
    })

    // js code to appear signup and login form
    signUp.addEventListener("click", ( )=>{
        container.classList.add("active");
    });
    login.addEventListener("click", ( )=>{
        container.classList.remove("active");
    });
Output

Check out Full Source Code On Github

