In this article, we are going to make animated login and registration form in HTML, CSS & JavaScript, so in this form we will have two sections one for login and second for signup, we will also add some animation while switching between these two.
You can see the demo here Animated Login and Registration Form in HTML, CSS
Pre-requisites To Make Animated Login and Registration Form in HTML, CSS & JavaScript
- Good knowledge of HTML.
- Good knowledge of CSS & CSS3.
- Good knowledge of JavaScript.
Building HTML Markup & Default Values
<div class="wrapper">
      <div class="title-text">
        <div class="title login">Login Form</div>
        <div class="title signup">Signup Form</div>
      </div>
      <div class="form-container">
        <div class="form-inner">
          <form action="#" class="login">
            <div class="field">
              <input type="text" placeholder="Email Address" required>
            </div>
            <div class="field">
              <input type="password" placeholder="Password" required>
            </div>
            <div class="pass-link"><a href="#">Forgot password?</a></div>
            <div class="field btn">
              <div class="btn-layer"></div>
              <input type="submit" value="Login">
            </div>
            <div class="signup-link">Not a member? <a href="">Signup now</a></div>
          </form>
				</div>
			</div>
</div>
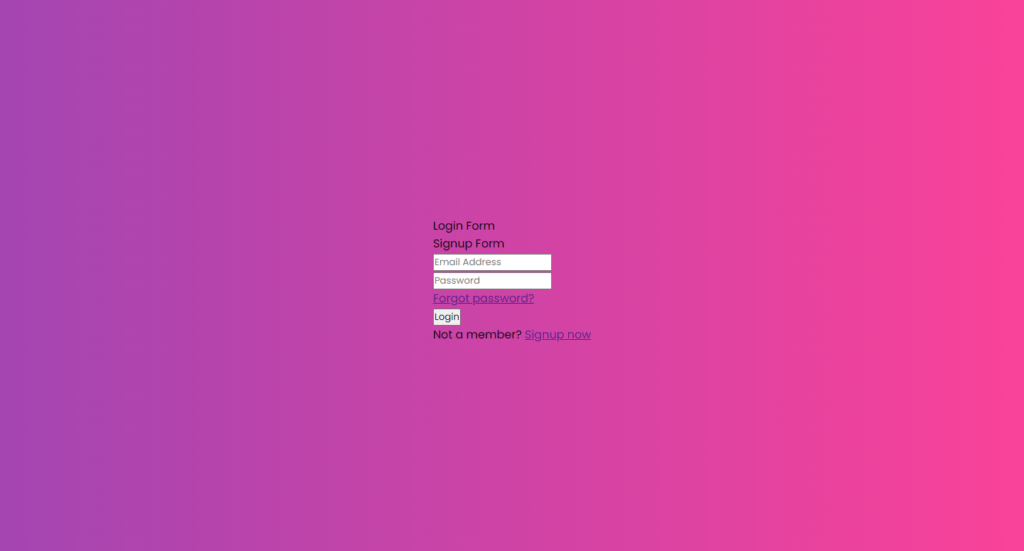
First of all, let’s make HTML markup in this we will add a div with class wrapper, so inside this let’s define add another div for login and signup title, after that add a container class named div inside that let’s add a form, this form contains email address, password field which are required to fill also forgot password link and sign up now link, this is basically login form we will add and customize signup form later on.
@import url('https://fonts.googleapis.com/css?family=Poppins:400,500,600,700&display=swap');
*{
  margin: 0;
  padding: 0;
  box-sizing: border-box;
  font-family: 'Poppins', sans-serif;
}
html,body{
  display: grid;
  height: 100%;
  width: 100%;
  place-items: center;
  background: -webkit-linear-gradient(left, #a445b2, #fa4299);
}
Now let’s add default values, first let’s add google fonts named Poppins this text we will use whole time in the project. after that, let’s select all elements with (*) in this let’s put margin and padding to 0, box-sizing to border box, and also font family to Poppins, sans-serif.
Let’s select html and body, in this display to grid with this all element will be formed in grid layout, height and width will be 100%, place items to center, so items will be set in center of screen, after that lets add background for that we used gradient color with #a445b2, #fa4299.

Customizing Login Form
.wrapper{
  overflow: hidden;
  max-width: 390px;
  background: #fff;
  padding: 30px;
  border-radius: 5px;
  box-shadow: 0px 15px 20px rgba(0,0,0,0.1);
}
.wrapper .title-text{
  display: flex;
  width: 200%;
}
.wrapper .title{
  width: 50%;
  font-size: 35px;
  font-weight: 600;
  text-align: center;

}
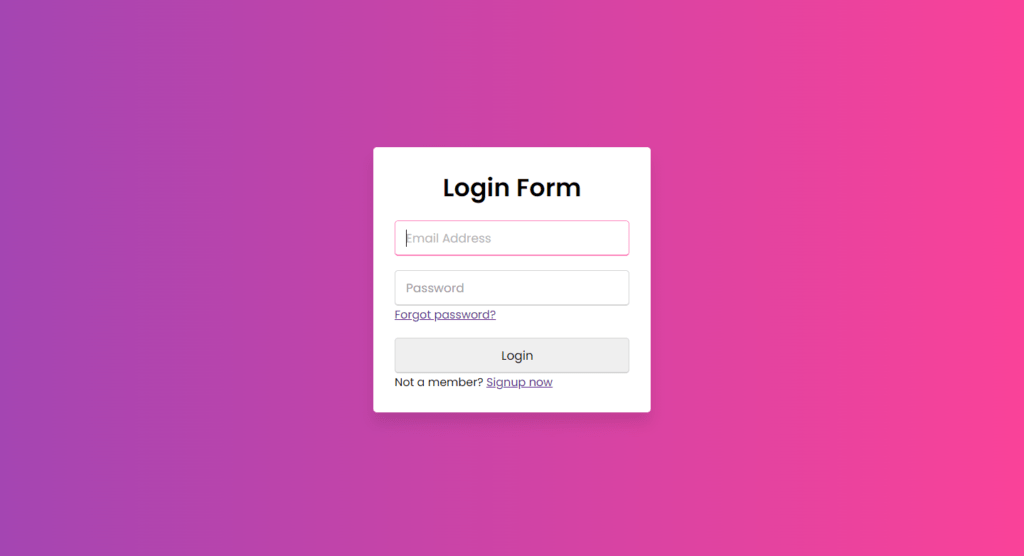
Let’s customize the for wrapper class, we will use overflow to hidden, so the out of the container won’t be displayed, max width will 390px, and box-shadow of 0px 15px 20px, this will show some shadow around the container of color rgba (0, 0, 0, 0.1) this is somewhat black type color. now we will make display to flex for title-text, also let’s provide font-weight to 600 this will make font bigger.
.wrapper .form-container{
  width: 100%;
  overflow: hidden;
}
.form-container .form-inner{
  display: flex;
  width: 200%;
}
.form-container .form-inner form{
  width: 50%;
	transition: all 0.6s cubic-bezier(0.68,-0.55,0.265,1.55);
}
.form-inner form .field{
  height: 50px;
  width: 100%;
  margin-top: 20px;
}
.form-inner form .field input{
  height: 100%;
  width: 100%;
  outline: none;
  padding-left: 15px;
  border-radius: 5px;
  border: 1px solid lightgrey;
  border-bottom-width: 2px;
  font-size: 17px;
	transition: all 0.3s ease;
}
.form-inner form .field input:focus{
  border-color: #fc83bb;

}
.form-inner form .field input::placeholder{
  color: #999;
	transition: all 0.3s ease;
}
form .field input:focus::placeholder{
  color: #b3b3b3;
}
Now in the input field outline will be none, so the default line outside the border will be removed then after border will be 1px solid and color of light grey, now let’s provide bottom border width of 2px. after that, let’s add focus on input field, we will change in here border color of #fc83bb and let’s add placeholder color of #999 also change color of placeholder to color to #b3b3b3 when focusing on input field. again, we need to add transition of ease type for .3 seconds on placeholder and on input field.
.form-inner form .pass-link{
  margin-top: 5px;
}
.form-inner form .signup-link{
  text-align: center;
  margin-top: 30px;
}
.form-inner form .pass-link a,
.form-inner form .signup-link a{
  color: #fa4299;
  text-decoration: none;
}
.form-inner form .pass-link a:hover,
.form-inner form .signup-link a:hover{
  text-decoration: underline;
}
form .btn{
  height: 50px;
  width: 100%;
  border-radius: 5px;
  position: relative;
  overflow: hidden;
}
form .btn .btn-layer{
  height: 100%;
  width: 300%;
  position: absolute;
  left: -100%;
  background: -webkit-linear-gradient(right, #a445b2, #fa4299, #a445b2, #fa4299);
  border-radius: 5px;
	transition: all 0.4s ease;
}
form .btn:hover .btn-layer{
  left: 0;
}
form .btn input[type="submit"]{
  height: 100%;
  width: 100%;
  z-index: 1;
  position: relative;
  background: none;
  border: none;
  color: #fff;
  padding-left: 0;
  border-radius: 5px;
  font-size: 20px;
  font-weight: 500;
  cursor: pointer;
}
After that, let’s focus on button now for this we used some height and width types of stuff and overflow we assigned as hidden, after that we want to provide some cool looking styling so for that we will add linear gradient colors as #a445b2, #fa4299, #a445b2, #fa4299 to button. also, we will apply animation all for 0.4 seconds and ease type.
Now in submit we will add z-index to 1, and the position to relative after that we will remove background and border so that our button won’t get default white background and border, now let’s add font weight of 500 and cursor to pointer by doing this is we hover the button the mouse cursor will be changed in pointer.

Adding The Signup Form
<form action="#" class="signup">
            <div class="field">
              <input type="text" placeholder="Email Address" required>
            </div>
            <div class="field">
              <input type="password" placeholder="Password" required>
            </div>
            <div class="field">
              <input type="password" placeholder="Confirm password" required>
            </div>
            <div class="field btn">
              <div class="btn-layer"></div>
              <input type="submit" value="Signup">
            </div>
          </form>
Now for sign up form, let’s just copy the login for and add a new field called confirm password, here we will omit the signup now pass links and forgot password links. We don’t need to change any CSS stuff for this because all provided classes are already customized, so we don’t need any extra things to do.

Adding Slide Controls
<div class="slide-controls">
          <input type="radio" name="slide" id="login" checked>
          <input type="radio" name="slide" id="signup">
          <label for="login" class="slide login">Login</label>
          <label for="signup" class="slide signup">Signup</label>
          <div class="slider-tab"></div>
        </div>
Now we have login and signup form, we just need to do is add the slide controls for that let’s add a div with slide-controls class, in this let’s use two radio buttons one for login and other one for signup.
.wrapper .slide-controls{
  position: relative;
  display: flex;
  height: 50px;
  width: 100%;
  overflow: hidden;
  margin: 30px 0 10px 0;
  justify-content: space-between;
  border: 1px solid lightgrey;
  border-radius: 5px;
}
.slide-controls .slide{
  height: 100%;
  width: 100%;
  color: #fff;
  font-size: 18px;
  font-weight: 500;
  text-align: center;
  line-height: 48px;
  cursor: pointer;
  z-index: 1;
  transition: all 0.6s ease;
}
.slide-controls label.signup{
  color: #000;
}
.slide-controls .slider-tab{
  position: absolute;
  height: 100%;
  width: 50%;
  left: 0;
  z-index: 0;
  border-radius: 5px;
  background: -webkit-linear-gradient(left, #a445b2, #fa4299);
  transition: all 0.6s cubic-bezier(0.68,-0.55,0.265,1.55);
}
input[type="radio"]{
  display: none;
}
#signup:checked ~ .slider-tab{
  left: 50%;
}
#signup:checked ~ label.signup{
  color: #fff;
  cursor: default;
  user-select: none;
}
#signup:checked ~ label.login{
  color: #000;
}
#login:checked ~ label.signup{
  color: #000;
}
#login:checked ~ label.login{
  cursor: default;
  user-select: none;
}
Firstly in slide controls, let’s position it to relative and display will be flex, after that lets provide justify content to space between so the login and signup labels won’t collapse, and some margin will be created between the labels.
After that, we want to our labels of 18px of font-size with font-weight of 500, again text will be in center so text-alignment to center, and label height we need so for that line height to 48px, we will use here z-index to 1, so it won’t get hide behind color again cursor to pointer. also, let’s add transition on all for 0.3 seconds of ease type.
let’s just style the slider tab as well, so for that we used here linear-gradient with #a445b2, #fa4299, now in this case we provided z-index to 0 the reason behind that is if we do z-index to 1 then the slider tab will be visible but login and signup labels will get hide behind the color. we will use here animation on all for 0.6 seconds we have use cubic bezier with this we can see the smooth animation, in signup and login labels, we used user-select to none so that none of the fields will be selected by default.

Adding JavaScript Functionality
      const loginText = document.querySelector(".title-text .login");
      const loginForm = document.querySelector("form.login");
      const loginBtn = document.querySelector("label.login");
      const signupBtn = document.querySelector("label.signup");
      const signupLink = document.querySelector("form .signup-link a");
      signupBtn.onclick = (()=>{
        loginForm.style.marginLeft = "-50%";
        loginText.style.marginLeft = "-50%";
      });
      loginBtn.onclick = (()=>{
        loginForm.style.marginLeft = "0%";
        loginText.style.marginLeft = "0%";
      });
      signupLink.onclick = (()=>{
        signupBtn.click();
        return false;
      });
Now we need to add functionality to switch from login form to signup form, for that we have defined some constants using query selector with the help of query selector we can fetch, or you can say bring the classes or name as given in the parameter. so just we need to add function on click in this we just added some margin from left when we click on signup button, and also we need another on click, here we reset all given margins for login button and for signup link button we just call the signup button function.
Full Source Code Of Animated Login and Registration Form in HTML, CSS & JavaScript
index.html
<!DOCTYPE html>
<html lang="en" dir="ltr">
  <head>
    <meta charset="utf-8">
    <title>Login & Signup Form | CodingNepal</title>
    <link rel="stylesheet" href="style.css">
    <meta name="viewport" content="width=device-width, initial-scale=1.0">
  </head>
  <body>
    <div class="wrapper">
      <div class="title-text">
        <div class="title login">Login Form</div>
        <div class="title signup">Signup Form</div>
      </div>
      <div class="form-container">
        <div class="slide-controls">
          <input type="radio" name="slide" id="login" checked>
          <input type="radio" name="slide" id="signup">
          <label for="login" class="slide login">Login</label>
          <label for="signup" class="slide signup">Signup</label>
          <div class="slider-tab"></div>
        </div>
        <div class="form-inner">
          <form action="#" class="login">
            <div class="field">
              <input type="text" placeholder="Email Address" required>
            </div>
            <div class="field">
              <input type="password" placeholder="Password" required>
            </div>
            <div class="pass-link"><a href="#">Forgot password?</a></div>
            <div class="field btn">
              <div class="btn-layer"></div>
              <input type="submit" value="Login">
            </div>
            <div class="signup-link">Not a member? <a href="">Signup now</a></div>
          </form>
          <form action="#" class="signup">
            <div class="field">
              <input type="text" placeholder="Email Address" required>
            </div>
            <div class="field">
              <input type="password" placeholder="Password" required>
            </div>
            <div class="field">
              <input type="password" placeholder="Confirm password" required>
            </div>
            <div class="field btn">
              <div class="btn-layer"></div>
              <input type="submit" value="Signup">
            </div>
          </form>
        </div>
      </div>
    </div>

    <script>
      const loginText = document.querySelector(".title-text .login");
      const loginForm = document.querySelector("form.login");
      const loginBtn = document.querySelector("label.login");
      const signupBtn = document.querySelector("label.signup");
      const signupLink = document.querySelector("form .signup-link a");
      signupBtn.onclick = (()=>{
        loginForm.style.marginLeft = "-50%";
        loginText.style.marginLeft = "-50%";
      });
      loginBtn.onclick = (()=>{
        loginForm.style.marginLeft = "0%";
        loginText.style.marginLeft = "0%";
      });
      signupLink.onclick = (()=>{
        signupBtn.click();
        return false;
      });
    </script>

  </body>
</html>
style.css
@import url('<https://fonts.googleapis.com/css?family=Poppins:400,500,600,700&display=swap>');
*{
  margin: 0;
  padding: 0;
  box-sizing: border-box;
  font-family: 'Poppins', sans-serif;
}
html,body{
  display: grid;
  height: 100%;
  width: 100%;
  place-items: center;
  background: -webkit-linear-gradient(left, #a445b2, #fa4299);
}
 ::selection{
  background: #fa4299;
  color: #fff;
}
.wrapper{
  overflow: hidden;
  max-width: 390px;
  background: #fff;
  padding: 30px;
  border-radius: 5px;
  box-shadow: 0px 15px 20px rgba(0,0,0,0.1);
}
.wrapper .title-text{
  display: flex;
  width: 200%;
}
.wrapper .title{
  width: 50%;
  font-size: 35px;
  font-weight: 600;
  text-align: center;
  transition: all 0.6s cubic-bezier(0.68,-0.55,0.265,1.55);
}
.wrapper .slide-controls{
  position: relative;
  display: flex;
  height: 50px;
  width: 100%;
  overflow: hidden;
  margin: 30px 0 10px 0;
  justify-content: space-between;
  border: 1px solid lightgrey;
  border-radius: 5px;
}
.slide-controls .slide{
  height: 100%;
  width: 100%;
  color: #fff;
  font-size: 18px;
  font-weight: 500;
  text-align: center;
  line-height: 48px;
  cursor: pointer;
  z-index: 1;
  transition: all 0.6s ease;
}
.slide-controls label.signup{
  color: #000;
}
.slide-controls .slider-tab{
  position: absolute;
  height: 100%;
  width: 50%;
  left: 0;
  z-index: 0;
  border-radius: 5px;
  background: -webkit-linear-gradient(left, #a445b2, #fa4299);
  transition: all 0.6s cubic-bezier(0.68,-0.55,0.265,1.55);
}
input[type="radio"]{
  display: none;
}
#signup:checked ~ .slider-tab{
  left: 50%;
}
#signup:checked ~ label.signup{
  color: #fff;
  cursor: default;
  user-select: none;
}
#signup:checked ~ label.login{
  color: #000;
}
#login:checked ~ label.signup{
  color: #000;
}
#login:checked ~ label.login{
  cursor: default;
  user-select: none;
}
.wrapper .form-container{
  width: 100%;
  overflow: hidden;
}
.form-container .form-inner{
  display: flex;
  width: 200%;
}
.form-container .form-inner form{
  width: 50%;
  transition: all 0.6s cubic-bezier(0.68,-0.55,0.265,1.55);
}
.form-inner form .field{
  height: 50px;
  width: 100%;
  margin-top: 20px;
}
.form-inner form .field input{
  height: 100%;
  width: 100%;
  outline: none;
  padding-left: 15px;
  border-radius: 5px;
  border: 1px solid lightgrey;
  border-bottom-width: 2px;
  font-size: 17px;
  transition: all 0.3s ease;
}
.form-inner form .field input:focus{
  border-color: #fc83bb;

}
.form-inner form .field input::placeholder{
  color: #999;
  transition: all 0.3s ease;
}
form .field input:focus::placeholder{
  color: #b3b3b3;
}
.form-inner form .pass-link{
  margin-top: 5px;
}
.form-inner form .signup-link{
  text-align: center;
  margin-top: 30px;
}
.form-inner form .pass-link a,
.form-inner form .signup-link a{
  color: #fa4299;
  text-decoration: none;
}
.form-inner form .pass-link a:hover,
.form-inner form .signup-link a:hover{
  text-decoration: underline;
}
form .btn{
  height: 50px;
  width: 100%;
  border-radius: 5px;
  position: relative;
  overflow: hidden;
}
form .btn .btn-layer{
  height: 100%;
  width: 300%;
  position: absolute;
  left: -100%;
  background: -webkit-linear-gradient(right, #a445b2, #fa4299, #a445b2, #fa4299);
  border-radius: 5px;
  transition: all 0.4s ease;
}
form .btn:hover .btn-layer{
  left: 0;
}
form .btn input[type="submit"]{
  height: 100%;
  width: 100%;
  z-index: 1;
  position: relative;
   background: none;
  border: none;
  color: #fff;
  padding-left: 0;
  border-radius: 5px;
  font-size: 20px;
  font-weight: 500;
  cursor: pointer;
}
Output


Check out Full Source Code On Github


