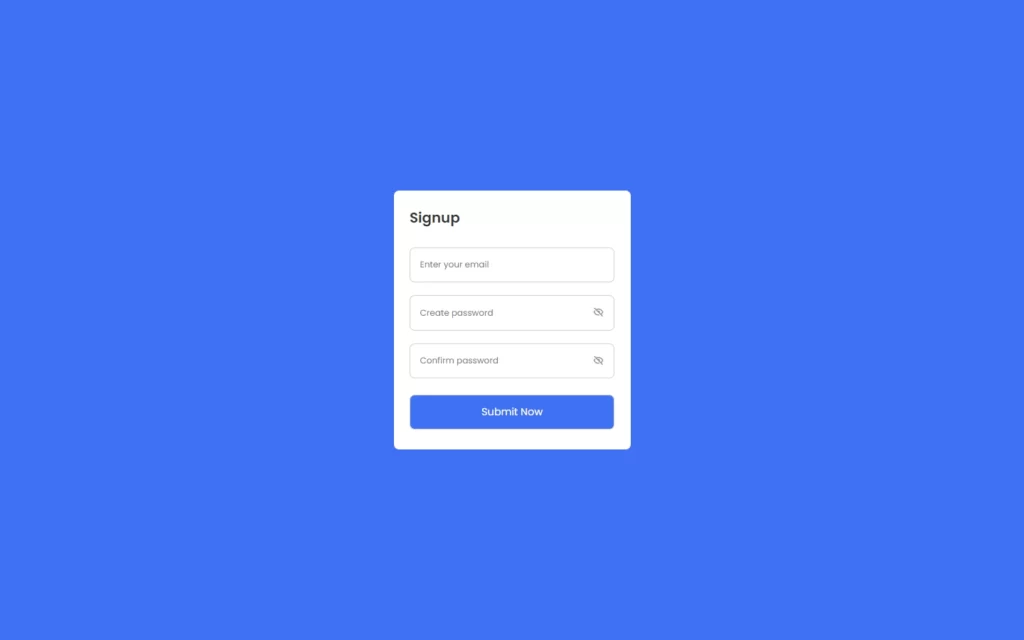
In this article, we will make a project to Check Confirm Password in JavaScript. We will add two input fields, one for password and other one for confirm password. Also, we will add a button and if we click the button then text from both field will be checked. If the password is wrong then the message will be wrong password, and if it is matching then we will show the password is correct. We will check these passwords using JavaScript. Let’s make this step-by-step.
Pre-requisites to Check Confirm Password in JavaScript
- Basic knowledge of HTML.
- Basic knowledge of CSS.
- Good knowledge of JavaScript.
Setting up The Project
For this project, we need to basically three files. First will be our index.html, in this we will add our elements, and you can simply say we will create the skeleton of the project using HTML file. Then for designing purpose we will be adding our style.css file, with this we will add some styles to our HTML, this is going to be purely based on you, like you can customize it any way. And lastly, our script.js file, this will be our main file because we will add password verification using the JavaScript file.
Now in HTML, we will be adding our link for box-icon, so that we can access some icons in our project like check icon and cross icon. After that, we have added our CSS file for basic designing. And lastly we have added our JavaScript file in body part, so that we can access the HTML elements, This is why our JS file in the bottom of the code.
<!DOCTYPE html>
<!-- Coding by CodingLab | www.codinglabweb.com-->
<html lang="en">
  <head>
    <meta charset="UTF-8" />
    <meta http-equiv="X-UA-Compatible" content="IE=edge" />
    <meta name="viewport" content="width=device-width, initial-scale=1.0" />
    <title>Email and Password Validation</title>

    <!-- CSS -->
    <link rel="stylesheet" href="css/style.css" />

    <!-- Boxicons CSS -->
    <link
      href="https://unpkg.com/boxicons@2.1.2/css/boxicons.min.css"
      rel="stylesheet"
    />
  </head>
  <body>
    <div class="container">
      <header>Signup</header>
      <form action="https://www.rocoderes.com/">
        <div class="field email-field">
          <div class="input-field">
            <input type="email" placeholder="Enter your email" class="email" />
          </div>
          <span class="error email-error">
            <i class="bx bx-error-circle error-icon"></i>
            <p class="error-text">Please enter a valid email</p>
          </span>
        </div>
        <div class="field create-password">
          <div class="input-field">
            <input
              type="password"
              placeholder="Create password"
              class="password"
            />
            <i class="bx bx-hide show-hide"></i>
          </div>
          <span class="error password-error">
            <i class="bx bx-error-circle error-icon"></i>
            <p class="error-text">
              Please enter atleast 8 charatcer with number, symbol, small and
              capital letter.
            </p>
          </span>
        </div>
        <div class="field confirm-password">
          <div class="input-field">
            <input
              type="password"
              placeholder="Confirm password"
              class="cPassword"
            />
            <i class="bx bx-hide show-hide"></i>
          </div>
          <span class="error cPassword-error">
            <i class="bx bx-error-circle error-icon"></i>
            <p class="error-text">Password don't match</p>
          </span>
        </div>
        <div class="input-field button">
          <input type="submit" value="Submit Now" />
        </div>
      </form>
    </div>

    <!-- JavaScript -->
    <script src="js/script.js"></script>
  </body>
</html>
We have added our code as above, in this we can see we have added a form, in which we have added three fields and a button. We have here added an input field for email, second input for password, and last input field for confirm password. Notice that, we have added icons for each of the input field and an error message with these. Also, we have added our submit button here on which we will add event listener to handle some operation using JS part. We also have added classes and ID’s, so that these elements can be controlled in CSS and JS file, in order to add style and functionalities.

Designing These Elements
As we can see here, the output of our HTML is straight-forward, but it doesn’t look so good. So we will add our custom designs to these elements to make the output very attractive and good. Since this project mainly depends on JavaScript, and designing is purely depending on the user that how does user need this form to look a like, so we don’t get so much in the deep in CSS. You can also apply this below code to make this project similar. Also, we will provide the full source code for this, so you can easily download and use it.
/* Google Fonts - Poppins */
@import url("https://fonts.googleapis.com/css2?family=Poppins:wght@300;400;500;600&display=swap");

* {
  margin: 0;
  padding: 0;
  box-sizing: border-box;
  font-family: "Poppins", sans-serif;
}
body {
  min-height: 100vh;
  display: flex;
  align-items: center;
  justify-content: center;
  background: #4070f4;
}
.container {
  position: relative;
  max-width: 370px;
  width: 100%;
  padding: 25px;
  border-radius: 8px;
  background-color: #fff;
}
.container header {
  font-size: 22px;
  font-weight: 600;
  color: #333;
}
.container form {
  margin-top: 30px;
}
form .field {
  margin-bottom: 20px;
}
form .input-field {
  position: relative;
  height: 55px;
  width: 100%;
}
.input-field input {
  height: 100%;
  width: 100%;
  outline: none;
  border: none;
  border-radius: 8px;
  padding: 0 15px;
  border: 1px solid #d1d1d1;
}
.invalid input {
  border-color: #d93025;
}
.input-field .show-hide {
  position: absolute;
  right: 13px;
  top: 50%;
  transform: translateY(-50%);
  font-size: 18px;
  color: #919191;
  cursor: pointer;
  padding: 3px;
}
.field .error {
  display: flex;
  align-items: center;
  margin-top: 6px;
  color: #d93025;
  font-size: 13px;
  display: none;
}
.invalid .error {
  display: flex;
}
.error .error-icon {
  margin-right: 6px;
  font-size: 15px;
}
.create-password .error {
  align-items: flex-start;
}
.create-password .error-icon {
  margin-top: 4px;
}
.button {
  margin: 25px 0 6px;
}
.button input {
  color: #fff;
  font-size: 16px;
  font-weight: 400;
  background-color: #4070f4;
  cursor: pointer;
  transition: all 0.3s ease;
}
.button input:hover {
  background-color: #0e4bf1;
}

Setting up Configurable in JS
Since our project looks cool and attractive, let’s add our functionalities using JavaScript. In JavaScript, we have added some constants, in which we are fetching the elements. Here, we are using the document.querySelector() method to fetch every needed element. We have first fetched our main form, then you can see we have fetched email-field class with the help of form.querySelector.
This may confuse you, but let me clarify it, with the help of document.querySelector we can fetch a particular element. Once we have fetched the element, we can use that constant name to fetch other elements which are present in that constant.
Here we can use form.querySelector because we already fetched the whole form element, then if we require something to fetch like email field here, we can use form instead of document.
const form = document.querySelector("form"),
  emailField = form.querySelector(".email-field"),
  emailInput = emailField.querySelector(".email"),
  passField = form.querySelector(".create-password"),
  passInput = passField.querySelector(".password"),
  cPassField = form.querySelector(".confirm-password"),
  cPassInput = cPassField.querySelector(".cPassword");
Adding E-mail Verification
Now we need to make use of these configurable. We will first add our e-mail verification in the function, we will also call this function on the submit button to check our e-mail. In this function, we have added a constant, in this we have added a regular expression. This regular expression is also known as the pattern, so we have added this pattern in the constant.
Then we are adding the condition to check the input field text pattern with the regular expression. If the pattern does not match, then we are adding the error class using emailField.classList.add("error"), in this class we have added our error message in our HTML. And if pattern get matched, then we will remove the error class.
// Email Validtion
function checkEmail() {
  const emaiPattern = /^[^ ]+@[^ ]+\.[a-z]{2,3}$/;
  if (!emailInput.value.match(emaiPattern)) {
    return emailField.classList.add("invalid"); //adding invalid class if email value do not mathced with email pattern
  }
  emailField.classList.remove("invalid"); //removing invalid class if email value matched with emaiPattern
}
Adding Show and Hide Password Functionality
Now we need to add functionality to show and hide password when we click on the eye icon. Since we have added our eye icon in the show-hide class, we need to fetch this class using querySelectorAll method. With this method, whichever element have show-hide class, those will be fetched here. Now we have looped our eyeIcon constant.
So we can click it as much we want. In this loop, we need to add a click event listener, in which we have getting the parent element of eye icon and selecting the password input using this const pInput = eyeIcon.parentElement.querySelector("input");. Then we have added a condition to check the type of the input and our constant, then we will just replace the hide icon with show icon, And return password as text in the input field.
const eyeIcons = document.querySelectorAll(".show-hide");

eyeIcons.forEach((eyeIcon) => {
  eyeIcon.addEventListener("click", () => {
    const pInput = eyeIcon.parentElement.querySelector("input"); //getting parent element of eye icon and selecting the password input
    if (pInput.type === "password") {
      eyeIcon.classList.replace("bx-hide", "bx-show");
      return (pInput.type = "text");
    }
    eyeIcon.classList.replace("bx-show", "bx-hide");
    pInput.type = "password";
  });
});

Adding Password Validations
Now we have added a function for password validation, in this function we have added a constant which hold regular expression, or you can say pattern for password. This is the pattern in which we need a symbol, a number, a capital letter and length of 8 of our password. Then after, we have added a condition to check pattern for password value with our regular expression. If it doesn’t match then we have added our error class in which we have error message and if it matched then we will remove the error class.
Now, in the confirm password field, we are just checking the text of the confirm password and password field. If these passwords are matching then we will remove the error class and if it does not match then we will add the error class.
// Password Validation
function createPass() {
  const passPattern =
    /^(?=.*[a-z])(?=.*[A-Z])(?=.*\d)(?=.*[@$!%*?&])[A-Za-z\d@$!%*?&]{8,}$/;

  if (!passInput.value.match(passPattern)) {
    return passField.classList.add("error"); //adding invalid class if password input value do not match with passPattern
  }
  passField.classList.remove("error"); //removing invalid class if password input value matched with passPattern
}

// Confirm Password Validtion
function confirmPass() {
  if (passInput.value !== cPassInput.value || cPassInput.value === "") {
    return cPassField.classList.add("error");
  }
  cPassField.classList.remove("error");
}
Checking Every Validation on Submit
We have just added an event listener on submit button. We have here used e.preventDefault(), so that submit button don’t redirect if fields are invalid. Here we have called all the functions, in which we have added the validations. Again, we have added a condition, if none of the fields contain the error class then, and then we will get the action attribute to perform the action provided in the action.
// Calling Funtion on Form Sumbit
form.addEventListener("submit", (e) => {
  e.preventDefault(); //preventing form submitting
  checkEmail();
  createPass();
  confirmPass();


  if (
    !emailField.classList.contains("error") &&
    !passField.classList.contains("error") &&
    !cPassField.classList.contains("error")
  ) {
    location.href = form.getAttribute("action");
  }
});
Full Source Code to Check Confirm Password in JavaScript
index.html
<!DOCTYPE html>
<!-- Coding by CodingLab | www.codinglabweb.com-->
<html lang="en">
  <head>
    <meta charset="UTF-8" />
    <meta http-equiv="X-UA-Compatible" content="IE=edge" />
    <meta name="viewport" content="width=device-width, initial-scale=1.0" />
    <title>Email and Password Validation</title>

    <!-- CSS -->
    <link rel="stylesheet" href="css/style.css" />

    <!-- Boxicons CSS -->
    <link
      href="https://unpkg.com/boxicons@2.1.2/css/boxicons.min.css"
      rel="stylesheet"
    />
  </head>
  <body>
    <div class="container">
      <header>Signup</header>
      <form action="https://www.rocoderes.com/">
        <div class="field email-field">
          <div class="input-field">
            <input type="text" placeholder="Enter your email" class="email" />
          </div>
          <span class="error email-error">
            <i class="bx bx-error-circle error-icon"></i>
            <p class="error-text">Please enter a valid email</p>
          </span>
        </div>
        <div class="field create-password">
          <div class="input-field">
            <input
              type="password"
              placeholder="Create password"
              class="password"
            />
            <i class="bx bx-hide show-hide"></i>
          </div>
          <span class="error password-error">
            <i class="bx bx-error-circle error-icon"></i>
            <p class="error-text">
              Please enter atleast 8 charatcer with number, symbol, small and
              capital letter.
            </p>
          </span>
        </div>
        <div class="field confirm-password">
          <div class="input-field">
            <input
              type="password"
              placeholder="Confirm password"
              class="cPassword"
            />
            <i class="bx bx-hide show-hide"></i>
          </div>
          <span class="error cPassword-error">
            <i class="bx bx-error-circle error-icon"></i>
            <p class="error-text">Password don't match</p>
          </span>
        </div>
        <div class="input-field button">
          <input type="submit" value="Submit Now" />
        </div>
      </form>
    </div>

    <!-- JavaScript -->
    <script src="js/script.js"></script>
  </body>
</html>
style.css
/* Google Fonts - Poppins */
@import url("https://fonts.googleapis.com/css2?family=Poppins:wght@300;400;500;600&display=swap");

* {
  margin: 0;
  padding: 0;
  box-sizing: border-box;
  font-family: "Poppins", sans-serif;
}
body {
  min-height: 100vh;
  display: flex;
  align-items: center;
  justify-content: center;
  background: #4070f4;
}
.container {
  position: relative;
  max-width: 370px;
  width: 100%;
  padding: 25px;
  border-radius: 8px;
  background-color: #fff;
}
.container header {
  font-size: 22px;
  font-weight: 600;
  color: #333;
}
.container form {
  margin-top: 30px;
}
form .field {
  margin-bottom: 20px;
}
form .input-field {
  position: relative;
  height: 55px;
  width: 100%;
}
.input-field input {
  height: 100%;
  width: 100%;
  outline: none;
  border: none;
  border-radius: 8px;
  padding: 0 15px;
  border: 1px solid #d1d1d1;
}
.error input {
  border-color: #d93025;
}
.input-field .show-hide {
  position: absolute;
  right: 13px;
  top: 50%;
  transform: translateY(-50%);
  font-size: 18px;
  color: #919191;
  cursor: pointer;
  padding: 3px;
}
.field .error {
  display: flex;
  align-items: center;
  margin-top: 6px;
  color: #d93025;
  font-size: 13px;
  display: none;
}
.error .error {
  display: flex;
}
.error .error-icon {
  margin-right: 6px;
  font-size: 15px;
}
.create-password .error {
  align-items: flex-start;
}
.create-password .error-icon {
  margin-top: 4px;
}
.button {
  margin: 25px 0 6px;
}
.button input {
  color: #fff;
  font-size: 16px;
  font-weight: 400;
  background-color: #4070f4;
  cursor: pointer;
  transition: all 0.3s ease;
}
.button input:hover {
  background-color: #0e4bf1;
}
script.js
const form = document.querySelector("form"),
  emailField = form.querySelector(".email-field"),
  emailInput = emailField.querySelector(".email"),
  passField = form.querySelector(".create-password"),
  passInput = passField.querySelector(".password"),
  cPassField = form.querySelector(".confirm-password"),
  cPassInput = cPassField.querySelector(".cPassword");

// Email Validtion
function checkEmail() {
  const emaiPattern = /^[^ ]+@[^ ]+\.[a-z]{2,3}$/;
  if (!emailInput.value.match(emaiPattern)) {
    return emailField.classList.add("error"); //adding invalid class if email value do not mathced with email pattern
  }
  emailField.classList.remove("error"); //removing invalid class if email value matched with emaiPattern
}

// Hide and show password
const eyeIcons = document.querySelectorAll(".show-hide");

eyeIcons.forEach((eyeIcon) => {
  eyeIcon.addEventListener("click", () => {
    const pInput = eyeIcon.parentElement.querySelector("input"); //getting parent element of eye icon and selecting the password input
    if (pInput.type === "password") {
      eyeIcon.classList.replace("bx-hide", "bx-show");
      return (pInput.type = "text");
    }
    eyeIcon.classList.replace("bx-show", "bx-hide");
    pInput.type = "password";
  });
});

// Password Validation
function createPass() {
  const passPattern =
    /^(?=.*[a-z])(?=.*[A-Z])(?=.*\d)(?=.*[@$!%*?&])[A-Za-z\d@$!%*?&]{8,}$/;

  if (!passInput.value.match(passPattern)) {
    return passField.classList.add("error"); //adding invalid class if password input value do not match with passPattern
  }
  passField.classList.remove("error"); //removing invalid class if password input value matched with passPattern
}

// Confirm Password Validtion
function confirmPass() {
  if (passInput.value !== cPassInput.value || cPassInput.value === "") {
    return cPassField.classList.add("error");
  }
  cPassField.classList.remove("error");
}

// Calling Funtion on Form Sumbit
form.addEventListener("submit", (e) => {
  e.preventDefault(); //preventing form submitting
  checkEmail();
  createPass();
  confirmPass();

  //calling function on key up
  emailInput.addEventListener("keyup", checkEmail);
  passInput.addEventListener("keyup", createPass);
  cPassInput.addEventListener("keyup", confirmPass);

  if (
    !emailField.classList.contains("error") &&
    !passField.classList.contains("error") &&
    !cPassField.classList.contains("error")
  ) {
    location.href = form.getAttribute("action");
  }
});
Output

Check out video reference here:


