


👋 Hello guys today we will learn how to make a JavaScript image editor very easy way. To make a beautiful image editor using javascript with HTML canvas. So let’s start 😀. In this Project our main Focus is javascript.
👉 You can see the Demo Here 👁javascript Image Editor: Create an image editor with HTML canvas and javascript
👉 First Create a 📂index.html File
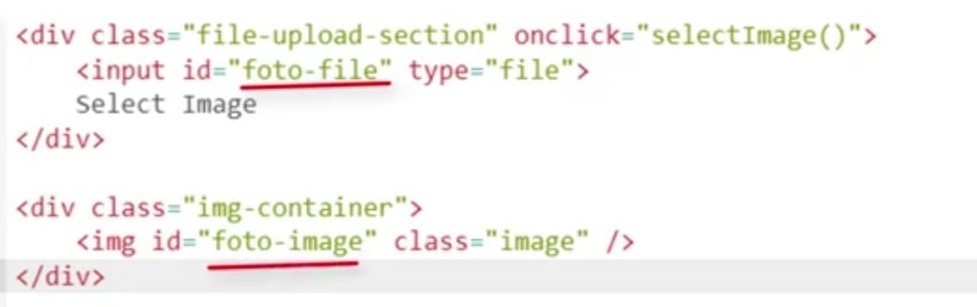
➜ Create a simple file input. Our first aim is we select one image file using the file input and display it in the image element.
<div class="file-upload-section" onclick="selectImage()">
    <input id='foto-file' type="file">
    Select Image
 </div>

  <div class="img-container">
     <img id='foto-image' class="image">
 </div>
➜ First, add a section to put few buttons just below the select image area. I am adding three buttons here for the crop, flip and rotate functionalities. I am adding onclick function for each of the buttons.
  <div class="upper-buttons-section">
        <table class="buttons-table">
            <tr>
                <td><button class="operation-btn" onclick="crop()">Crop</button></td>
                <td><button class="operation-btn" onclick="flipVertically()">Flip</button></td>
                <td>
                <button class="operation-btn" onclick="displayRange()">
                    Rotate
                    <input type="range" id='rotate-range' value='0' min='0' max='360' onchange="rotate(this)">
                </button>
            </td>

            </tr>
        </table>
    </div>
➜ Now make few buttons that will be used to add effects to the image. And also need to add another button to download the edited image. Add three more buttons. three filtering buttons I am adding here along with onclick function name.
<div class="button-sections">
<table class="buttons-table">
<tr>
<td><button class="operation-btn" onclick="makeGrayScale()">GrayScale</button></td>
<td><button class="operation-btn" onclick="makeBright()">Brighter</button></td>
<td><button class="operation-btn" onclick="makeDark()">Darker</button></td>
</tr>
<tr>
<td><button class="operation-btn" onclick="makeBlur()">Blur</button></td>
<td><button class="operation-btn" onclick="makeEmboss()">Emboss</button></td>
<td><button class="operation-btn" onclick="makeSharp()">Sharp</button></td>
</tr>
<tr>
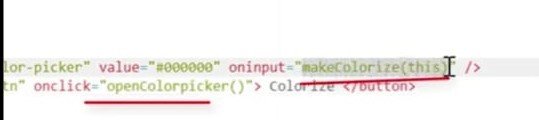
<td>
<input type="color" id='color-picker' value='#000000' oninput="makeColorize(this)">
<button class="operation-btn" onclick="openColorPicker()">Colorize</button>
</td>
<td>
<input type="color" id='colorize-color-picker' value='#000000' oninput="applyColorFilter(this)">
<button class="operation-btn" onclick="openColorFilterPicker()">Color Filter</button>
</td>
<td><button class="operation-btn" onclick="makeTransparent()">
<div id="color-preview"></div>
Transparent</button></td>
</tr>
<tr>
<td colspan="3"><button class="operation-btn download-btn" onclick="download()">Download</button></td>
</tr>
</table>
</div>💡 Now It’s time For Javascript Code 😎.
👉 Now Create a 📂index.js File
➜ we write a few javascript coding for the display of the image. Now I use one library For our image editing purpose. This library is open source and is hosted in GitHub. The library is extremely easy to use.
➜ This cdn Link For this library 👇
<script src="https://rawcdn.githack.com/kousik19/foto.js/045defe1a5ce06220e084e4e6f6fbaccb7621841/foto.min.js"></script>Let’s start 😃 javascript coding section
➜ First, define a global variable foto. Then inside windows.onload function creates an object of foto class. Here foto class is defined inside the library.
 var foto;
 window.onload=function(){
        foto=new Foto()
 }
➜ In the HTML file, you see that we have added one on-click event on the file upload section.

➜ Let’s define that select image method. All we want is clicking on the file upload section will perform click event on input type equal to file.
➜ Here just you have to remember that the input type file should have Id foto-file and the image element Id must be foto-image.
😃Now we defined some methods in javascript
1.makeGrayScale method
➜ inside makeGrayScale method you just have to write one line code.
 function makeGrayScale(){
            foto.grayscale()
   }
2. makeBright method
 function makeBright(){
            foto.makeBright()
   }
3.makeDark method
 function makeDark(){
            foto.makeDark()
    }
4.makeBlur method
 function makeBlur(){
        foto.applyBlurFilter()
    }
5.makeEmboss method
function makeEmboss(){
        foto.applyEmbossFilter()
 }
6.makeSharp method
   function makeSharp(){
    foto.applySharpFilter()
}
➜ Here you can just notice how easily 😃 image effects can be added.
➜ To download the image you just have to write foto.export()
function download(){
foto.export()
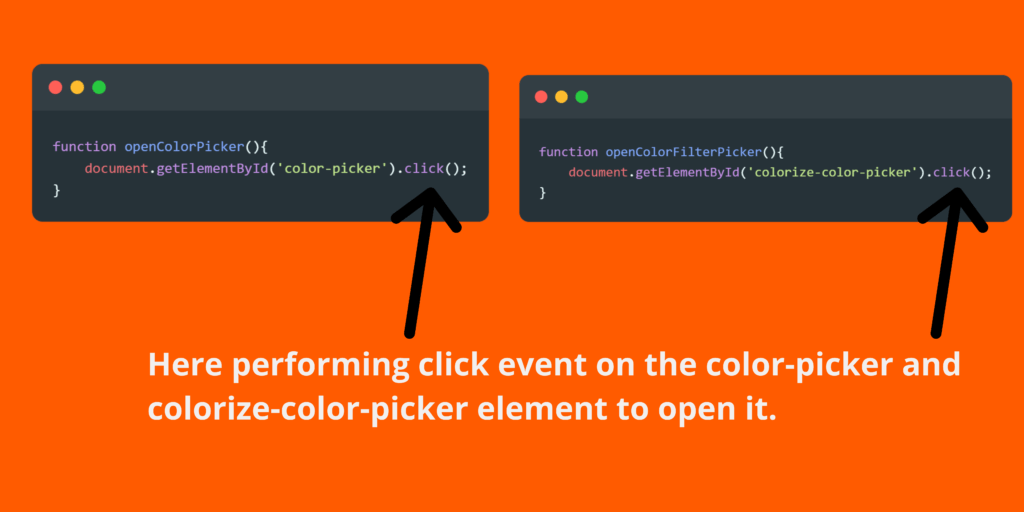
}➜ In the HTML section, you can see that we have a onclick function. For the but named open color picker, and above that input, type equals to color. We have another function makeColorize. Which will be invoked. When the color picker value will be changed. Let’s define those functions in javascript.
 function openColorPicker(){
            document.getElementById('color-picker').click();
        }
        function makeColorize(elem){
            var color=elem.value
            console.log("color",color)
            foto.colorize(color)
        }
➜ Let’s proceed with color filter functionality. in HTMLSection you can see this is quite similar to the makeColorize .

 function openColorFilterPicker(){
            document.getElementById('colorize-color-picker').click();
        }
  function applyColorFilter(elem){
            var color=elem.value
            foto.applyColorFilter(color)
        }
➜ Let’s implement Transparent functionality.
  function makeTransparent(){
            foto.makeTransparent()
        }
➜ Now proceed with crop and flip.
  function crop(){
            foto.cropSelected()
        }
        function flipVertically(){
            foto.flipVertically()
        }
➜ implement Rotate functionality
  function rotate(elem){
    foto.rotate(elem.value)
}
👉 Source Code: javascript Image Editor: Create an image editor with HTML canvas and javascript
👉 If you want to clear the basic concepts of JavaScript you must read this:
➜ 15 JavaScript Basic Concepts You Should Know
👉 watch the Full Video 👁 of JavaScript Image Editor: Create an image editor with HTML canvas and javascript 👇

