


In this article, we will Make Expanding Cards using HTML, CSS, and JavaScript. We will be adding some images in this, and we will add them as shrunk and small version of the screen using CSS Styling, and lastly we will add expanding functioning to it using JavaScript. This will be very easy and beginner-friendly, so let’s make it step-by-step.
Pre-requisites to Make Expanding Cards using HTML, CSS, and JavaScript
- Basic knowledge of HTML.
- Good knowledge of CSS.
- Good knowledge of JavaScript.
Creating HTML Markup and Adding Image
<!DOCTYPE html>
<html lang="en">
<head>
<meta charset="UTF-8">
<meta name="viewport" content="width=device-width, initial-scale=1.0">
<link rel="stylesheet" href="style.css">
<title>My Project</title>
</head>
<body>
<div class="container">
<div class="panel active" style="background-image: url('https://images.unsplash.com/photo-1558979158-65a1eaa08691?ixlib=rb-1.2.1&ixid=eyJhcHBfaWQiOjEyMDd9&auto=format&fit=crop&w=1350&q=80');">
<h3>Explore The World</h3>
</div>
<div class="panel"
style="background-image: url('https://images.unsplash.com/photo-1572276596237-5db2c3e16c5d?ixlib=rb-1.2.1&ixid=eyJhcHBfaWQiOjEyMDd9&auto=format&fit=crop&w=1350&q=80');">
<h3>Wild Forest</h3>
</div>
<div class="panel"
style="background-image: url('https://images.unsplash.com/photo-1507525428034-b723cf961d3e?ixlib=rb-1.2.1&ixid=eyJhcHBfaWQiOjEyMDd9&auto=format&fit=crop&w=1353&q=80');">
<h3>Sunny Beach</h3>
</div>
<div class="panel"
style="background-image: url('https://images.unsplash.com/photo-1551009175-8a68da93d5f9?ixlib=rb-1.2.1&ixid=eyJhcHBfaWQiOjEyMDd9&auto=format&fit=crop&w=1351&q=80');">
<h3>City on Nature</h3>
</div>
<div class="panel"
style="background-image: url('https://images.unsplash.com/photo-1549880338-65ddcdfd017b?ixlib=rb-1.2.1&ixid=eyJhcHBfaWQiOjEyMDd9&auto=format&fit=crop&w=1350&q=80');">
<h3>Mountains - Clouds</h3>
</div>
</div>
<script src="script.js"></script>
</body>
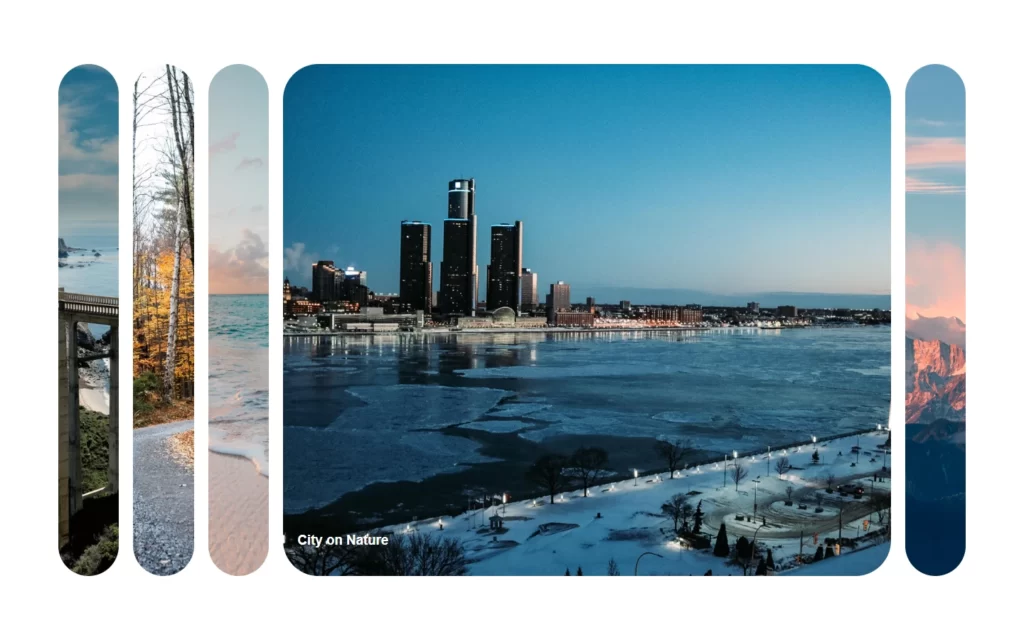
</html>In HTML, we have linked our CSS file for styling, and we have also linked a script file for adding functionality. Now we have added a div container in which we will add our images. Then we have added multiple divs for panel for each image. In these panels we will add a text and image will be added as background image for these tags. Here we have added 5 images and one of them we made added active class. We will define these active classes in our CSS to expand our images.

Customizing The Images
@import url('https://fonts.googleapis.com/css2?Muli&display=swap');

*{
    box-sizing: border-box;
}

body{
    font-family: 'Muli', sans-serif;
    margin: 0;
    display:flex;
    align-items: center;
    justify-content: center;
    min-height: 100vh;
    overflow:hidden;
}

.container{
    display:flex;
    width:90vw;
}

.panel{
    background-size: cover;
    background-position: center;
    background-repeat: no-repeat;
    height:80vh;
    border-radius: 50px;
    flex:0.5;
    position:relative;
    transition: flex 0.5s ease-in;
    color:#fff;
    cursor:pointer;
    margin:10px;
}

.panel h3{
    position:absolute;
    bottom:20px;
    left:20px;
    opacity:0;
}

.panel.active{
    flex:5;
}

.panel.active h3{
    opacity:1;
     transition: opacity 0.4s ease-in 0.4s;
}
Now in CSS, we have removed our default margin and padding, then we have centered our content using some properties like align-items and justify-content properties. Also, we have fixed some height to our content. After that, we have extended our image height not width, so that it will be stretched vertically. Also, we have added flex to 0.5 so that image will be fit according to text width. Then we have added some transition on these cards, with this we will get some animation when we extend the image.
Now in active class we just need to extend value of flex, we have made flex 0.5 to 5, so width will be extended.

Adding Responsiveness
With the help of below code, we have added responsiveness where we have maximum width of 480px.
@media(max-width:480px){
    .container{
        width:100vw;
    }

    .panel:nth-of-type(4),.panel:nth-of-type(5){
        display:none;
    }
}
Adding Functionality to Images
const panels = document.querySelectorAll('.panel');

panels.forEach(panel => {
    panel.addEventListener('click', () => {
        removeActiveClasses();
        panel.classList.add('active');
    })
})

function removeActiveClasses(){
    panels.forEach(panel => {
        panel.classList.remove('active');
    })
}
In the JavaScript part, we have fetched panel classes in which we have added our images using the querySelectorAll method. Then we have added a loop for each of the panel, in these panels we have added a click event, in this we have called a function. In this function, we are removing active class using removeActiveClasses() function. And we have added active class on clicked panel.

Full Source Code of Expanding Cards using HTML, CSS, and JavaScript
index.html
<!DOCTYPE html>
<html lang="en">
<head>
    <meta charset="UTF-8">
    <meta name="viewport" content="width=device-width, initial-scale=1.0">
    <link rel="stylesheet" href="style.css">
    <title>My Project</title>
</head>
<body>
    <div class="container">
        <div class="panel active" style="background-image: url('https://images.unsplash.com/photo-1558979158-65a1eaa08691?ixlib=rb-1.2.1&ixid=eyJhcHBfaWQiOjEyMDd9&auto=format&fit=crop&w=1350&q=80');">
            <h3>Explore The World</h3>
        </div>

        <div class="panel"
            style="background-image: url('https://images.unsplash.com/photo-1572276596237-5db2c3e16c5d?ixlib=rb-1.2.1&ixid=eyJhcHBfaWQiOjEyMDd9&auto=format&fit=crop&w=1350&q=80');">
            <h3>Wild Forest</h3>
        </div>

        <div class="panel"
            style="background-image: url('https://images.unsplash.com/photo-1507525428034-b723cf961d3e?ixlib=rb-1.2.1&ixid=eyJhcHBfaWQiOjEyMDd9&auto=format&fit=crop&w=1353&q=80');">
            <h3>Sunny Beach</h3>
        </div>

        <div class="panel"
            style="background-image: url('https://images.unsplash.com/photo-1551009175-8a68da93d5f9?ixlib=rb-1.2.1&ixid=eyJhcHBfaWQiOjEyMDd9&auto=format&fit=crop&w=1351&q=80');">
            <h3>City on Nature</h3>
        </div>

        <div class="panel"
            style="background-image: url('https://images.unsplash.com/photo-1549880338-65ddcdfd017b?ixlib=rb-1.2.1&ixid=eyJhcHBfaWQiOjEyMDd9&auto=format&fit=crop&w=1350&q=80');">
            <h3>Mountains - Clouds</h3>
        </div>
    </div>

    <script src="script.js"></script>
</body>
</html>
style.css
@import url('https://fonts.googleapis.com/css2?Muli&display=swap');

*{
    box-sizing: border-box;
}

body{
    font-family: 'Muli', sans-serif;
    margin: 0;
    display:flex;
    align-items: center;
    justify-content: center;
    min-height: 100vh;
    overflow:hidden;
}

.container{
    display:flex;
    width:90vw;
}

.panel{
    background-size: cover;
    background-position: center;
    background-repeat: no-repeat;
    height:80vh;
    border-radius: 50px;
    flex:0.5;
    position:relative;
    transition: flex 0.5s ease-in;
    color:#fff;
    cursor:pointer;
    margin:10px;
}

.panel h3{
    position:absolute;
    bottom:20px;
    left:20px;
    opacity:0;
}

.panel.active{
    flex:5;
}

.panel.active h3{
    opacity:1;
     transition: opacity 0.4s ease-in 0.4s;
}

@media(max-width:480px){
    .container{
        width:100vw;
    }

    .panel:nth-of-type(4),.panel:nth-of-type(5){
        display:none;
    }
}
script.js
const panels = document.querySelectorAll('.panel');

panels.forEach(panel => {
    panel.addEventListener('click', () => {
        removeActiveClasses();
        panel.classList.add('active');
    })
})

function removeActiveClasses(){
    panels.forEach(panel => {
        panel.classList.remove('active');
    })
}
Output
Check out video reference here:


